Running X-Plane in Virtual Reality
X-Plane 11 has supported native virtual reality, or VR, since version 11.20. The additional X-Plane system requirements for running the sim in VR are:
- Windows 8 64 bits or newer operating system
- HTC Vive, Oculus Rift, or Windows Mixed Reality (WMR)
- Steam VR installed for Vive/WMR and “Windows Mixed Reality for SteamVR” for WMR.
Your CPU & GPU will need to meet all additional requirements as specified by your headset manufacturer. X-Plane supports the HTC Vive, Oculus Rift, and Windows Mixed Reality (WMR). The Oculus Quest platform is not supported by X-Plane.
Note: Steam VR is a free download that enables X-Plane 11 to use VR. Steam VR is compatible with the X-Plane 11 DVD set, digital download edition, and X-Plane on Steam.
No Intel GPUs are supported. Room-sized VR is supported, as well as using joysticks and other USB devices.
To get started using VR, first set up your device according to manufacturer’s instructions. You may need to enable foreign apps in the VR system settings. For example, with the Oculus Rift, you would go to Settings > General and toggle the button to the right to enable apps from Unknown Sources, such as X-Plane.
Next, if you don’t already have it, Vive and WMR users will need to download the Steam software and create a free account in order to install SteamVR. Once the Steam client is installed and you have signed in, go to Library > VR. Click on SteamVR under the Tools section in the left sidebar, then the install button.
If you’re using a Windows Mixed Reality (WMR) device, in addition to SteamVR you’ll also need to install “Windows Mixed Reality for SteamVR,” which is available from the Steam Library as well.
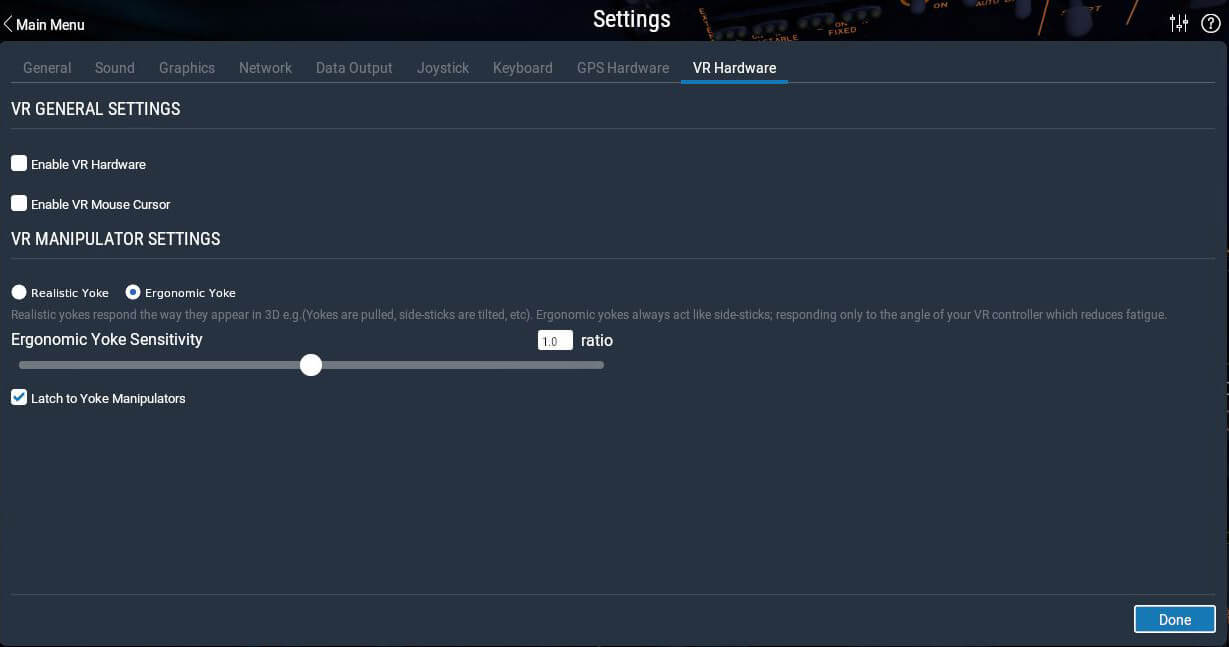
Finally, launch X-Plane and go to Settings > VR Hardware. As long as your headset is attached, there will be a check box at the bottom to “Enable VR hardware.”
You can turn VR off by unchecking the box in Settings, or by using the large blue Disable VR Headset button in the X-Plane window on the computer.
Once VR is up and running on all devices, you should find yourself in a virtual hangar in X-Plane. From here you can access the main menu, all settings, and any pop up warning screens.
Controls & Manipulators
The default fleet (minus the SR-71) is VR-ready but 3rd party aircraft are probably far less usable in VR unless you use the 3D mouse to interact with the cockpit. Feel free to try other aircraft but be aware they may have limited functionality & use.
In general, the manipulators in and around the aircraft function the way they would it real life. Grab the throttle of the Cessna 172 by pressing and holding the trigger near it. It will light up green, then push or pull the knob to adjust the setting, for example. Alternatively, you can use “laser manipulation” to interact with objects. Lightly and partially squeeze the VR controller trigger to see a green laser appear. Aim that laser at the thing you want to interact with and ‘grab it’ by squeezing the trigger the rest of the way in. This feature essentially takes traditional manipulation and lets you perform the motion at any distance or angle that is convenient for you.
By default, the pilot yoke behaves in a realistic manner–tilt your wrist left or right for roll, and push in or pull out to control pitch. This behavior can be tiring if you fly for long hours at a time, so you can switch to “ergonomic” mode by using the checkboxes in Settings > VR Hardware. Ergonomic mode behaves slightly differently than real life–it works by tilting your wrist up or down to control pitch, and rolling your wrist left right for roll. (Moving forward and back does nothing.) This allows you to keep your hand in a relaxed and comfortable position while you fly and also allows you to be more precise with the controls.
In addition, the yoke is a “latching” manipulator by default: if you click it once, your controller will stay attached to it. You must press the trigger a second time to release it. You may also change this behavior by unchecking the “Latch to yoke manipulators” checkbox in VR Hardware settings.
Some rudder input will be added automatically as roll is controlled in order to allow you to taxi on the ground if you don’t have rudder pedals attached. If you do have hardware rudder pedals, it is up to you to control them.
Move around the aircraft or the world by using teleport: push down on the thumb stick (Oculus) or touchpad (Vive) to see a blue arc with a circle at the end, which is your landing spot. As you rotate the thumb stick you’ll move the red line on the circle, which indicates your view direction when the teleport is executed. Some parts of the aircraft, such as seats, have a hotspot which will light up and snap you to that location.
“VR Quick-Zoom” is a command that you can bind to your controller or a key. When you press the button, it zooms your view in so you can see distant things a bit clearer. When you release the button, your view resets.
Press the three line button (the menu button) of the virtual controller to access the menu options. Note that the “Get in Pilot’s Seat” controller menu option (the top most icon) is both a shortcut into the cockpit if you’ve moved to a different view, and a way to recenter yourself in the pilot seat. This option is the only supported way to recenter your view inside the cockpit.

The three-line menu option opens the main menu so you can access the usual options: load or save a flight, change your view, modify the flight, and so on. Use the thumb stick (Oculus) or touchpad (Vive) to move around menus and submenus, then use the trigger on the controller to select an option.

Using the Mouse in VR
You can turn on a 3D mouse cursor while using VR by checking the “Enable 3D Mouse Cursor” box in Settings > VR Hardware. You can also bind a joystick button or key to this option. This cursor will function basically the same as a non-VR mouse. Clicking the right mouse button will open up the VR menu, which is the equivalent to the traditional horizontal menu bar in non-VR X-Plane flights.
Troubleshooting
Stuttering or Low FPS
VR is more demanding on your computer than simply using the desktop simulator. If you are not consistently running at least 45 fps in the base desktop sim, you will need to turn rendering settings down. Review these instructions on setting the rendering options if you need to adjust your settings for VR.
Oculus Rift Tips
Juddering/Glitching during flight
- Lower your “Numer of World Objects” in Settings > Graphics
- Disable “Draw Shadows on Scenery” in Settings > Graphics
- Disable Asynchronous Space Warp (ASW) in the Oculus Debug Tool. Currently, this must be done each time X-Plane is launched.
Error 306 when trying to start X-plane or enable VR (and VR won’t enable)
- Quit Steam VR (if running) and X-Plane
- Restart X-Plane, re-enable VR
No image at all in HMD, but X-Plane shows a scene
- Quit SteamVR (if running), X-Plane
- Kill OVRServer in task manager process list using “kill process tree”
- Restart X-Plane, re-enable VR
Oculus Home or settings menu in HMD, but no tracking in X-Plane
- Quit X-Plane, SteamVR (if running)
- Kill VRCompositor, VRServer, VRDashboard in process manager task list
- Restart X-Plane, re-enable VR
Windows Mixed Reality (WMR) Tips
- Put on the WMR device or manually launch the Mixed Reality Portal BEFORE launching X-Plane. If you launch X-Plane first, the Mixed Reality Portal can hang the computer requiring a reboot.
- Currently the thumbsticks on the WMR controllers do not have a useful IN-PRESS/Click. That click is being stolen by SteamVR for internal functions. Clicking the thumbstick is currently causing the controllers to become unresponsive to X-Plane until the Mixed Reality Portal, SteamVR and X-Plane are restarted. This is being investigated but for now it’s best to just use the X/Y axis of the thumbsticks and not the click function.
- Windows Mixed Reality VR controllers require a good bluetooth connection to the PC. Many PC’s use an external WiFi antenna for their bluetooth signal as well. If you’re having trouble with the WMR controllers not appearing or being unstable and disconnecting, make sure your WiFi antenna is attached securely.